
If you’re staring at your cactus right now—soft, yellowing, maybe a little mushy—and wondering, “Did I just kill my cactus by giving it too much love?” — don’t worry, you’re not alone. Overwatering is actually the most common mistake people make with cacti, especially if you’re new to plant care or used to watering more thirsty houseplants.
Cacti are built for survival in some of the harshest, driest environments on Earth. But that resilience comes with a trade-off: they hate sitting in wet soil. Unlike tropical plants, their roots are designed to soak up moisture fast—and then dry out completely. So when they stay wet for too long, things can go downhill quickly.
The good news? In many cases, an overwatered cactus can be revived— but timing and the right approach are everything.
As someone who’s been in the plant care world for years—reviving everything from shriveled succulents to root-rotted cacti—I’ve seen firsthand how a struggling plant can bounce back with just a few smart steps. In this guide, I’ll walk you through exactly how to tell if your cactus is overwatered, how to fix it step by step, and how to keep it thriving long-term.
No fluff, no guesswork—just clear, practical advice backed by experience and horticultural best practices. Let’s bring that cactus back to life.
How to Know If Your Cactus Is Overwatered
Cacti are known for being tough and low-maintenance, which is why it’s so frustrating when something goes wrong—especially if you’ve been taking good care of it. The truth is, overwatering is one of the most common reasons cacti start to decline. The good news? Your cactus usually sends out warning signs before things get critical.
I’ve worked with cactus owners who’ve accidentally loved their plants a little too much, and I’ve revived more than a few soggy, leaning cacti. Here’s what I always tell them: catching the symptoms early can save your plant.
Here’s how to spot an overwatered cactus:
1. Discoloration: Yellow, Pale, or Brown Patches
One of the first things you’ll notice is a change in color. If your cactus is turning yellow or developing pale, faded areas—especially near the base—it’s a sign of stress. In many cases, this discoloration means the roots are getting too much water and can’t breathe.
Important note: While yellowing can also happen from too much sunlight or pests, when it’s paired with a regular watering schedule, overwatering is usually the cause.
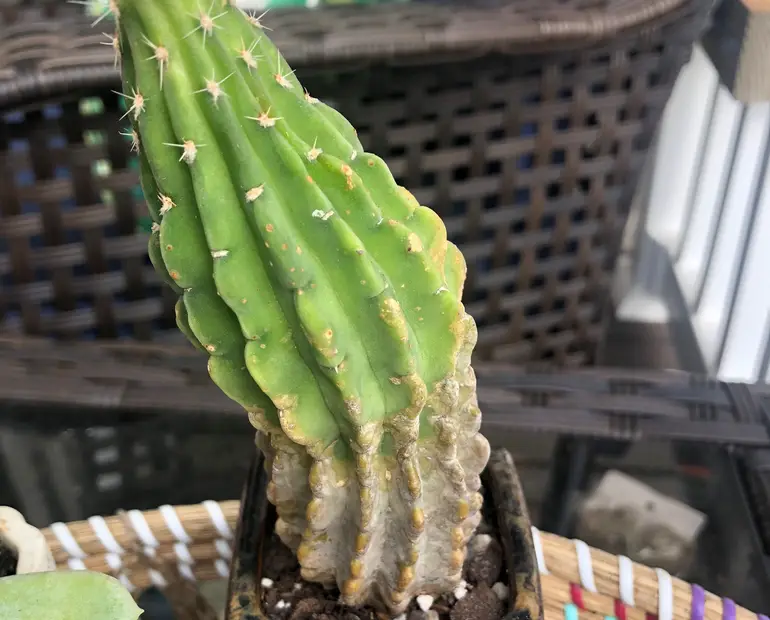
2. Mushy or Soft Texture
Gently press the stem or base of the cactus. A healthy cactus should feel firm. If it feels soft, squishy, or waterlogged, the internal tissues may be breaking down due to excess moisture. This softness is often a sign that root rot is setting in from below.
3. Black or Brown Spots
Dark patches—especially ones that feel damp or slimy—are often signs of rot. These can start small and quickly spread. If you’re seeing black or brown spots near the base or lower stem, take action right away. Left untreated, the rot can move upward and kill the whole plant.
4. Unpleasant Smell at the Base
Rotting roots give off a musty or sour smell. If your cactus’s pot smells earthy in a bad way or like mildew when you get close, there’s likely bacterial or fungal rot happening below the surface. This often confirms what you suspect based on softness or color changes.
5. Leaning or Drooping
A cactus that suddenly starts to lean or slump over isn’t just being dramatic—it’s telling you something is wrong. An overwatered cactus can become heavy and unstable because of waterlogged tissues. In some cases, the base becomes too soft to hold the plant upright.
This can be confusing, because a limp cactus might look thirsty. But here’s the key difference: when a cactus is underwatered, it shrivels and becomes dry. When it’s overwatered, it bloats, weakens, and collapses.
Still Not Sure?
If your cactus checks even two or three of these boxes, there’s a good chance overwatering is the issue. And don’t worry—many cacti can bounce back if you act quickly.
Next, I’ll walk you through exactly what to do to help your cactus recover, from removing it safely from wet soil to encouraging new, healthy root growth. Let’s get to it.
Why Overwatering Happens (and How to Avoid It Next Time)
Let’s be honest—most people don’t mean to overwater their cactus. It often comes from a good place: you care, you want your plant to thrive, and watering just feels like the right thing to do. But here’s the reality—cacti aren’t like other houseplants, and that’s where things go sideways.
After working with countless cactus owners (and making my fair share of mistakes early on), I can tell you that overwatering almost always comes down to one of these common issues. The good news? Once you understand the why, it’s much easier to avoid the same trap again.
1. The Wrong Pot (No Drainage = Big Trouble)
This one tops the list. If your cactus is in a pot without a drainage hole, excess water has nowhere to go—and the roots end up sitting in soggy soil.
Even if you’re watering just a little, water that can’t drain quickly turns deadly. Cactus roots are built for fast-draining desert conditions, not wet feet.
Expert Tip: Always choose a pot with at least one drainage hole. Terracotta pots are even better because they allow the soil to breathe and dry out faster.
2. Using Regular Potting Soil Instead of Cactus Mix
Not all soil is created equal. Regular potting soil is designed to retain moisture—great for ferns or peace lilies, terrible for cacti.
A cactus needs a mix that drains fast and dries out quickly. Without that, even a light watering can turn the root zone into a swamp.
Try This Instead: Use a well-draining cactus mix or make your own with 2 parts coarse sand or perlite, 2 parts potting soil, and 1 part small gravel or pumice.
3. Watering on a Schedule (Instead of by Feel)
Cacti don’t work on a weekly watering routine. One week it might dry out in 3 days, and the next week it might still be moist after 10—depending on light, humidity, and temperature.
Watering every Saturday “just because” is one of the easiest ways to overdo it.
The Smarter Way: Check the soil first—if it’s dry at least two inches down (stick your finger in or use a moisture meter), then you can water. If it’s even slightly damp, wait.
4. Ignoring the Season
Most cacti grow actively in the warmer months and go into dormancy during fall and winter. But many people keep watering them the same way all year long.
During dormancy, your cactus hardly uses any water—and overwatering during this time almost always leads to root rot.
What to Do: In winter, scale back your watering dramatically—sometimes once every 3 to 5 weeks is enough, depending on your indoor environment.
5. High Indoor Humidity or Poor Airflow
If your cactus is living in a humid bathroom or a room with very little airflow, water will naturally take longer to evaporate. That slow drying process can lead to constantly damp soil, even if you’re not watering often.
Expert Advice: Keep your cactus in a room with good airflow and bright, indirect sunlight. A sunny windowsill with ventilation is ideal.
Overwatering is rarely about pouring too much water at once—it’s usually about water staying in the soil too long. That’s why even small tweaks, like switching to the right soil or choosing the right pot, can make a massive difference.
Now that you know why overwatering happens, let’s move on to what really matters—how to save your cactus if it’s already in trouble.
Step-by-Step Guide to Revive an Overwatered Cactus
So, your cactus is looking rough—soft, discolored, maybe even leaning. You’ve figured out that overwatering is the problem. Now what?
Here’s the good news: an overwatered cactus isn’t always a lost cause. With the right steps, many can bounce back. But timing is key. The earlier you act, the better your chances.
This guide walks you through exactly what I do when rescuing a cactus in trouble—step by step.
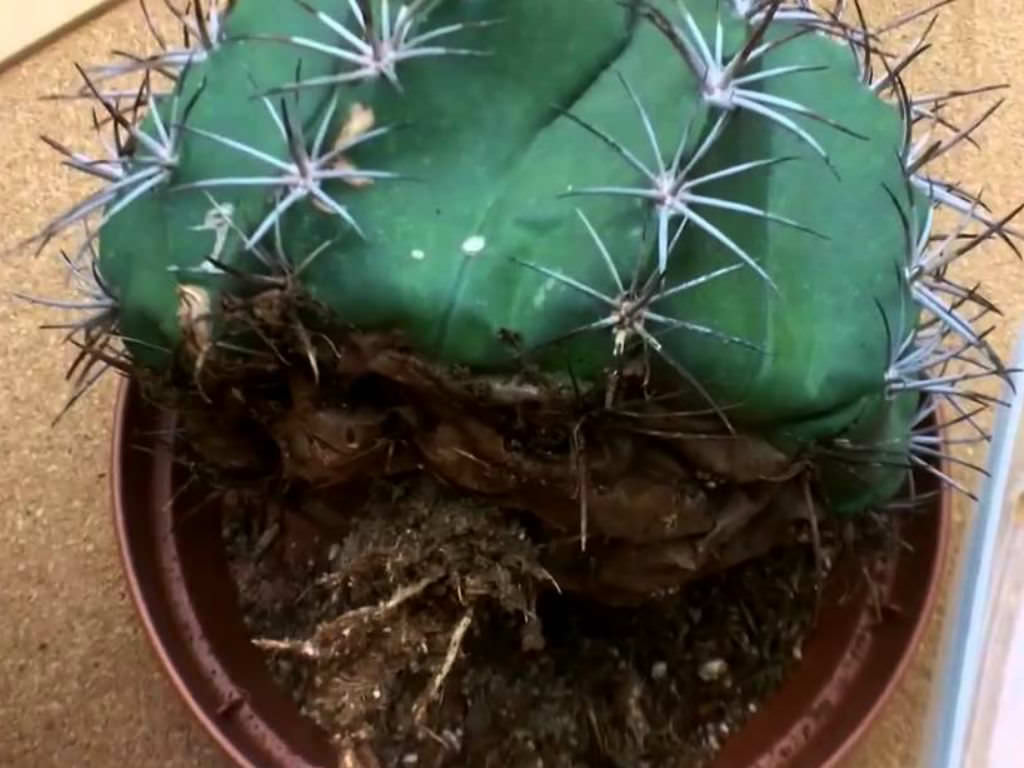
Step 1: Remove the Cactus from Its Pot
Start by gently taking the cactus out of its pot. If the soil is very wet, it might fall apart easily—that’s okay. Be careful not to tug too hard at the base; if needed, tip the pot sideways and let gravity help.
Why this matters: You need to get the roots out of that wet environment as soon as possible. Leaving it in soggy soil can allow rot to spread fast.
Pro tip: Wear gloves or use a towel to handle spiny cacti safely.
Step 2: Inspect the Roots Closely
Shake off as much soil as you can. Then, look closely at the root system.
Healthy roots will be firm and white or light tan. But if you see roots that are black, brown, mushy, or smell bad, that’s rot—and it needs to go.
Use a clean pair of scissors or pruning shears to carefully cut away all the affected roots. Don’t leave any rotten bits behind—they’ll only invite more trouble later.
Expert tip: Always sterilize your cutting tool before and after trimming (you can use rubbing alcohol). This prevents the spread of fungus or bacteria.
Step 3: Let the Plant Dry Out
This step might feel strange, but it’s absolutely essential: don’t replant the cactus right away.
Place it in a dry, shaded spot (not direct sun) and let it rest for at least 24 to 72 hours. This gives the wounds time to callous over and prevents new rot from forming after repotting.
Depending on how much you had to trim and how damp the plant was, give it enough time to fully dry out.
Real-world advice: This “drying period” is often where people get impatient. Don’t rush it. Your cactus needs this pause to recover.
Step 4: Repot Using the Right Soil and Pot
Once the cactus is dry and the roots are trimmed, it’s time to repot.
Use a well-draining cactus mix—never regular potting soil. If you’re making your own mix, combine potting soil with coarse sand and perlite or pumice to keep it loose and airy.
Choose a pot with drainage holes. Avoid glass containers or decorative pots with no way for excess water to escape.
Tip from experience: Terracotta pots are great—they absorb moisture from the soil and allow faster drying.
Step 5: Wait Before Watering Again
This part is critical. After repotting, don’t water right away.
Let the cactus sit in its new soil, completely dry, for about 7 to 10 days. This gives the roots time to adjust and heal without being exposed to moisture too soon.
When you do water, go light. Give the soil a slow, deep soak and make sure any extra water drains out fully. Then—leave it alone until the soil is completely dry again.
Bonus tip: If you’re unsure when to water again, a simple moisture meter or the “finger test” (2 inches deep) works wonders.
Reviving an overwatered cactus takes a bit of patience, but I’ve seen even badly damaged plants bounce back when given the right care. Trust the process. Your cactus doesn’t need fixing overnight—it just needs the right conditions and time.
In the next part, I’ll show you what to do if the damage is too far gone—and how you can still save part of the plant through propagation.
When You Can’t Save It — Start Over with Propagation
Let’s be real—sometimes, despite your best efforts, a cactus is just too far gone. The rot might have spread too deep, the base might be mushy beyond repair, or there may not be enough healthy root left to support recovery.
And you know what? That’s okay.
As someone who’s handled a lot of cactus rescue cases, I’ll tell you something most plant lovers eventually learn: not every cactus can be saved—but that doesn’t mean it’s the end of the road. You can still preserve part of the plant and start fresh through propagation.
It’s actually easier than most people think—and it’s one of the most effective ways to turn a bad situation into a fresh start.
What Is Propagation?
Propagation simply means taking a healthy part of the plant—usually a stem or pad—and using it to grow a new one.
In cactus care, this is a go-to method when the roots or base are damaged beyond saving.
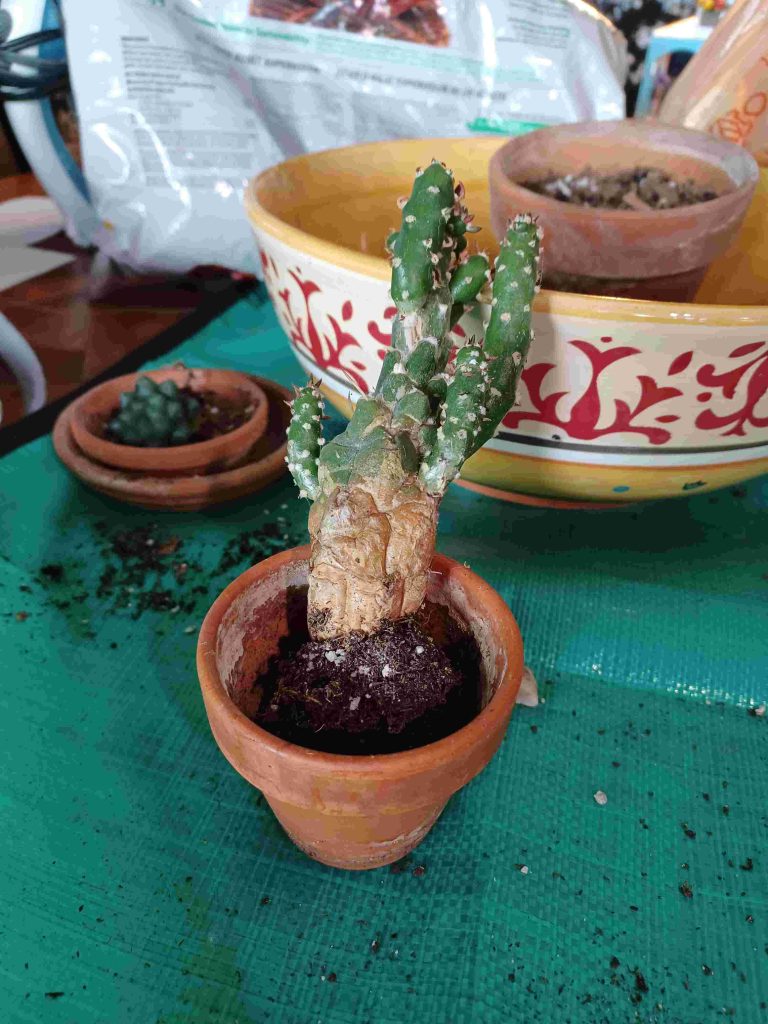
Step-by-Step: How to Propagate a Cactus from a Healthy Cutting
Step 1: Identify a Healthy Section
Look for a part of the cactus that looks firm, green (or its natural color), and rot-free.
It should be well above any mushy, dark, or discolored areas.
Expert tip: Make sure the part you cut is at least a few inches long. It needs enough energy stored inside to survive and grow roots.
Step 2: Make a Clean Cut
Use a clean, sharp knife or pruning tool to cut the healthy section away from the rest of the plant. Make the cut as smooth and straight as possible.
Important: Sterilize your tool first with rubbing alcohol or boiling water. This helps prevent infection in the fresh wound.
Step 3: Let the Cutting Callous Over
Place the cutting in a dry, shaded area for several days to a week, depending on the size and thickness of the cactus.
The goal is to let the cut end dry out and form a callous, which protects it from rotting once planted.
If you skip this step, there’s a high risk the new cutting will rot in the soil.
Step 4: Plant in Dry, Well-Draining Soil
Once the end is dry and sealed, plant the cutting upright in a small pot filled with dry cactus mix. Do not water it yet. Let it sit for another 7 to 10 days before the first watering.
Real-world advice: You won’t see action right away. Roots take time to grow—but behind the scenes, the cutting is preparing to anchor itself.
Step 5: Water Sparingly After Roots Form
After the first week or two, you can water lightly—just enough to slightly moisten the soil. Then wait until the soil is fully dry before watering again.
In a few weeks to a couple of months, roots should start to form. You can gently tug the cactus to check—if there’s resistance, it means roots are growing.
A Fresh Start, Not a Failure
Losing a cactus can feel like a setback, especially if you’ve cared for it for a long time. But propagation gives you a second chance—and it’s something even experienced cactus growers do regularly.
So if your cactus can’t be saved, don’t throw it all away. Salvage what’s healthy, give it time, and let it start fresh.
That little cutting might just surprise you.
In the next section, I’ll show you how to prevent this from happening again by building better watering habits and cactus care routines.
Aftercare Tips to Prevent Future Overwatering
Now that you’ve rescued (or restarted) your cactus, let’s make sure it doesn’t get overwatered again. These quick tips come from years of hands-on plant care and will help you build better habits moving forward.
1. Water Only When the Soil Is Completely Dry
Don’t stick to a schedule—check the soil first. Stick your finger two inches deep; if it feels dry, you’re good to water. Still moist? Wait a few more days.
2. Use the Right Soil and Pot
Cactus roots hate soggy soil. Use a fast-draining cactus mix and always plant in a pot with drainage holes. Terracotta pots work especially well for keeping things dry.
3. Adjust for the Season
Cacti need less water in cooler months. In winter, you might only need to water once every 3–5 weeks. Let the soil—and the plant—rest.
4. Keep the Environment in Mind
Place your cactus in a bright spot with good airflow. Avoid humid rooms like bathrooms, and make sure it’s getting enough indirect sunlight to help the soil dry out.
5. Know Your Plant
Different cacti have different needs. Desert types want less water than jungle types. A quick Google search on your cactus variety goes a long way.
Expert Insight: Did You Know?
Overwatering doesn’t just drown cactus roots — it also creates the perfect environment for fungal infections to take hold and spread quickly. That’s why catching the problem early and acting fast can save your plant from serious damage.
Conclusion
The truth is, many overwatered cacti can bounce back—especially if you catch the problem early and follow the right steps. Reviving your cactus won’t happen overnight; it takes patience and consistent care, sometimes weeks or even months. But with a little time, your plant can regain its strength and thrive again.
Have you ever dealt with an overwatered cactus? Share your experience or questions in the comments below—I’d love to hear from you and help out.
Found this guide helpful? Subscribe now for more practical indoor plant rescue tips and keep your green friends healthy and happy!